
Managing Custom Domains
Guide to connecting existing domains and purchasing new ones
Connecting an Existing Domain
To connect an existing domain to your blog, follow these steps:
- Access the Domains Page: Navigate to the Domains section in your blog's dashboard.
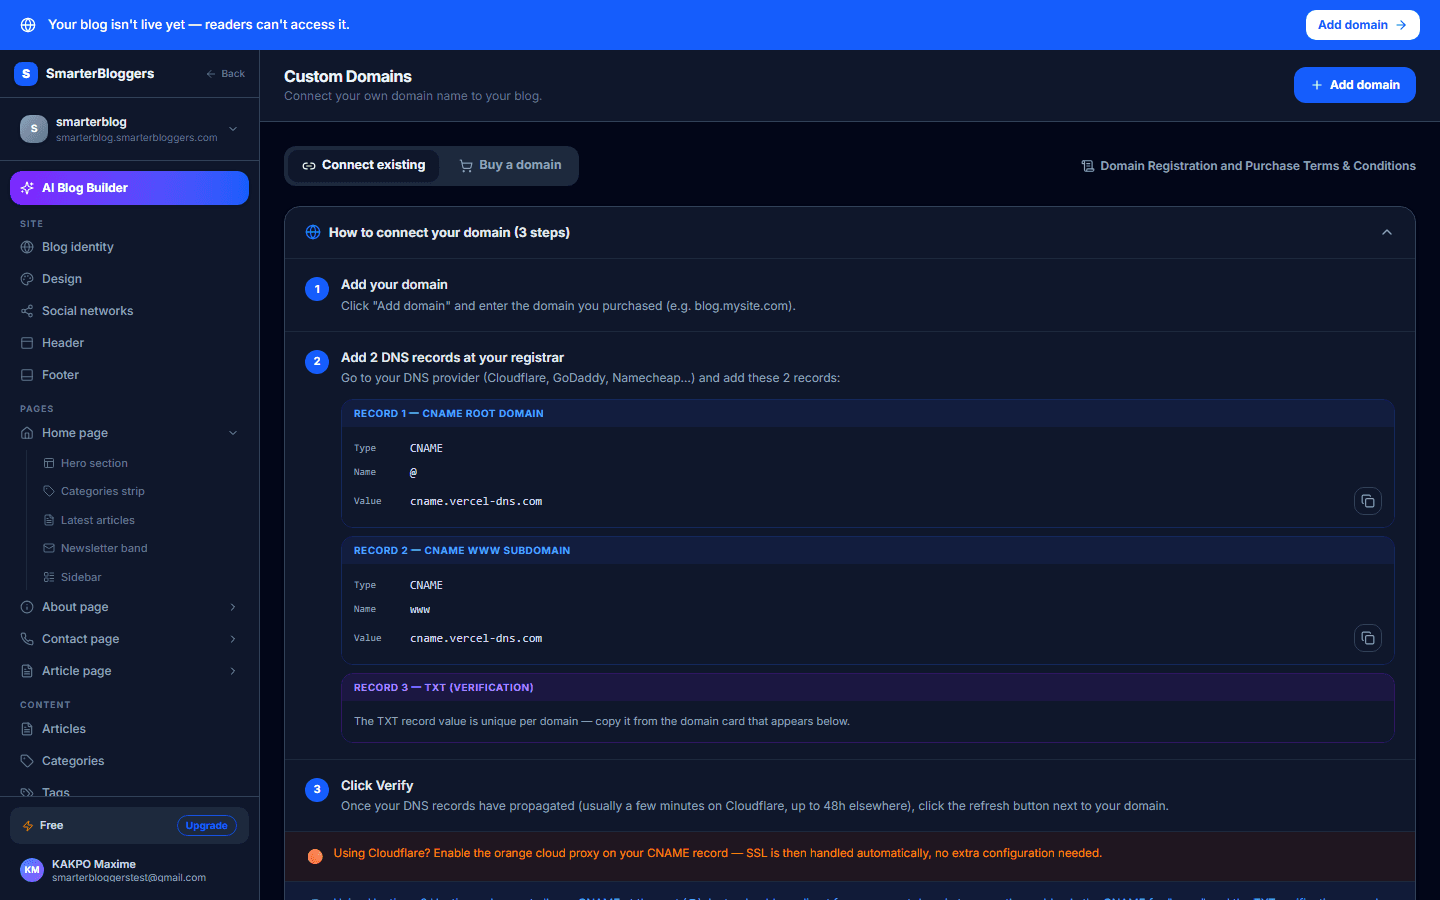
- Open the Add Domain Form: Click on the 'Add Domain' button to open the form.
- Enter Domain Name: Type your domain name in the input field and press 'Enter' or click the 'Add' button.
- Verify Domain: Once added, you need to verify the domain by updating your DNS settings.
- CNAME Record: Set a CNAME record with the name '@' pointing to 'cname.vercel-dns.com'.
- CNAME Record for WWW: Set another CNAME record with the name 'www' pointing to 'cname.vercel-dns.com'.
- TXT Record: Add a TXT record with the verification token provided in the dashboard.
- Verification Process: After updating DNS records, click the 'Verify' button next to your domain in the dashboard. If verification fails, ensure your DNS settings are correct and try again.
- Ensure DNS changes are saved and propagated before verification.
- Use the 'Copy' button to easily copy DNS values.
Purchasing a New Domain
To purchase a new domain through the platform, follow these steps:
- Switch to the Buy Tab: On the Domains page, switch to the 'Buy' tab.
- Search for a Domain: Enter your desired domain name in the search bar and click 'Search'.
- Select a Domain: From the search results, select an available domain to purchase.
- Fill Registrant Information: Provide the necessary registrant details including name, email, phone, address, city, country, and zipcode.
- Choose Payment Options: Select the number of years for registration and whether to enable auto-renew.
- Consent to Terms: Check the box to agree to the Domain Registration and Purchase Terms & Conditions.
- Proceed to Payment: Click 'Proceed to Payment' and complete the transaction using the integrated payment system.
- Ensure all registrant information is accurate to avoid issues.
- Review the terms and conditions carefully before proceeding.
Managing Domain Orders
You can manage your domain orders directly from the Domains page:
- Pending Orders: View orders that are paid but not yet registered. These are visible under 'Pending Orders'.
- Retry Failed Orders: If an order fails, you can retry the registration process by clicking the 'Retry' button next to the failed order.
- Refunds: Orders marked as 'Refund Pending' or 'Refunded' indicate the refund status.
The dashboard automatically refreshes to show the latest status of your domain orders.
- Check the status of your domain orders regularly.
- Contact support if an order remains in 'Pending' for an extended period.
Renewing a Domain
To renew a domain purchased through the platform:
- Locate the Domain: Find the domain you wish to renew in the Domains list.
- Click Renew: Click the 'Renew' button next to the domain.
- Complete Payment: Follow the prompts to complete the renewal payment.
Renewals can be set for 1 to 10 years, and the cost will be calculated based on the current renewal price.
- Ensure your payment method is up to date before renewing.
- Consider enabling auto-renew to avoid lapses in domain ownership.
Setting a Primary Domain
You can set one of your connected domains as the primary domain for your blog:
- Find the Domain: In the Domains list, locate the domain you want to set as primary.
- Set as Primary: Click the 'Set as Primary' button. This will update your blog's primary domain to the selected domain.
The primary domain is the default domain visitors will see when accessing your blog.
- Only one domain can be set as primary at a time.
- Ensure the primary domain is verified before setting it.
Deleting a Domain
To remove a domain from your blog:
- Locate the Domain: In the Domains list, find the domain you wish to delete.
- Delete Domain: Click the 'Delete' button and confirm the deletion.
Deleting a domain removes it from your blog's settings but does not affect the domain registration status with the registrar.
- Ensure you no longer need the domain before deleting.
- Consider backing up DNS settings before removal.
What's next?
Now that you have set up your custom domain, explore our guides on optimizing your blog's SEO and enhancing its performance with plugins and integrations.